
A motion sensor light switch adds automation to your home by turning on the light when the motion sensor detects people in the room and automatically turning off the light when the room is empty without the need for you to touch a thing. Upgrading the regular light switches in your house with motion-activated ones can help save on your electric bills significantly.
Unlike regular light switches that can work right after installation, the motion sensor light switch needs to be well-adjusted before putting it into use.
A motion sensor light switch has a motion sensor integrated into the switch case, which constantly detects motion and controls whether to turn the light on or off. Without proper programming to the motion sensor, a newly installed motion sensor light switch with the default pattern might not work the same as you desire. Sometimes it might falsely turn on the light due to high sensitivity or won’t turn off because of a long time out.
With that said, after installing a motion sensor light switch, the first thing we need to do is to program the settings of the motion sensor switch. Motion sensor light switches from various brands or manufacturers may require different methods for customization. Users should always look at the user manual first for instruction.
For classic motion sensor light switches, such as Leviton occupancy sensor switches, you need to remove the control panel cover on the switch first, then you can adjust the toggles or dials beneath the cover to change settings.
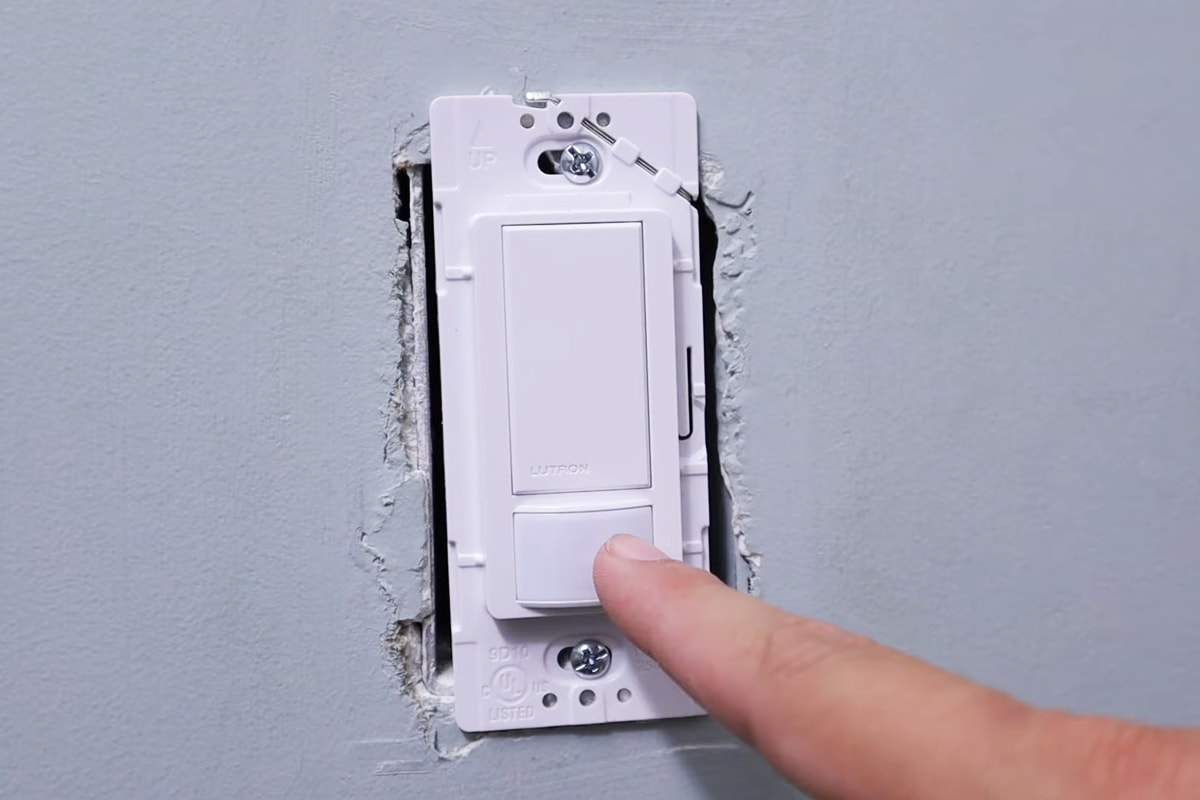
For modern motion sensor light switches, users can adjust most of the settings by pressing the button on the surface directly without removal of the cover. For example, the Lutron Maestro motion sensor switch allows users to adjust the time out setting by press&hold the ON/OFF button. Without the need for toggles and dials for customization, modern motion sensor switches end up in a much thinner case, and they can fit perfectly well with other regular or dimmer switches in the wallbox.
We’ll take the Lutron Maestro motion sensor switch as an example and go through how to program and adjust the motion sensor light switch for the best result.
Sensor Mode
Sensor mode, also known as operation mode or motion detection mode, determines how the motion sensor detects motion and controls the lights. Generally, there are two main sensor modes: occupancy mode and vacancy mode. Sometimes they are called an occupancy sensor or vacancy sensor instead.
Most occupancy sensors, sometimes labeled as occupancy/vacancy sensors, have both sensor modes available, allowing users to change the working mode. Some motion sensor switches have a fixed sensor mode with either occupancy or vacancy and cannot be changed after. Users should look carefully before purchasing.
Occupancy Mode
The occupancy mode, also known as AUTO ON/OFF mode or an occupancy sensor, is the default mode for most motion sensor light switches.
In occupancy mode, The motion sensor automatically turns on the light when you enter the room(room is occupied) and automatically turns off the light when you leave the room(room is vacant), thus the name occupancy mode.
Vacancy Mode
The vacancy mode, also known as MANUAL ON/AUTO OFF mode or a vacancy sensor, is the default mode of a vacancy sensor switch or can be selected in an occupancy/vacancy motion sensor switch.
In vacancy mode, the motion sensor requires the user to manually press the ON/OFF button on the switch to turn on the light and will automatically turn off the light when you leave the room(room is vacant), thus the name vacancy mode.
Manual Override
The lighting control process is almost entirely automatic in either occupancy or vacancy mode, which is overall a good thing. Sometimes the fully automated lighting control can also cause inconvenience if we cannot have a decent level of manual control of the motion sensor switches when necessary.
For example, if we want to view a presentation in a conference room, but the light keeps on and cannot be turned off manually, the ample illumination will make it challenging to have a clear view of the content in the presentation.
To solve these real-life problems, manual override features have been added to make these motion sensor light switches more practical and user-friendly.
For example, the Lutron Maestro motion sensor switch introduces two manual modes:
Manual Off-While-Occupied Enabled: The sensor automatically turns on when you enter the room, and turns off when you vacate the room. When this mode is enabled, if you turn the lights off when you enter the room, they will remain off as long as the room remains occupied and the Timeout has not expired. In simple words, it’s similar to a permanent manual off.
Manual Off-While-Occupied Disabled: The sensor automatically turns on when you enter the room, and turns off when you vacate the room. When in this mode, if you turn the lights off while in the room, they will automatically turn back on after a 25 second period if motion is detected. In simple words, it’s similar to a temporary manual off.
To program the sensor mode of a Lutron Maestro sensor switch:
- Press and hold the auxiliary button(need to remove the cover wallplate).
- Release the button after the lens flashes for the X(th) time.
- For models (MS-OPS2 MS-OPS5M)
- 1st time: Occupancy mode
- 2nd time: Vacancy mode
- 3rd time: Occupancy mode with ambient light
- 4th time: Occupancy mode with manual override
- For models (MS-OPS6M2-DV MS-OPS6M2U-DV UMS-OPS6M2-DV)
- 1st time: Occupancy mode with manual override
- 2nd time: Vacancy mode
- 3rd time: Occupancy mode with ambient light with manual override
- 4th time: Occupancy mode
Time Out / Time Delay
The time out or time delay determines how long the lights will remain on after the motion sensor can no longer detect any motion in the area. Time delay keeps the lighting and illumination consistent and reduces the possibility of the light’s false turn-off due to the motion sensor not being able to detect people far from the sensor.
Obviously, a short time delay can reduce electricity waste so the light will turn off as soon as you leave the room. In the meantime, a shorter time delay might also produce accidental turn-offs when the motion sensor is used to detect a large area. The ability to detect small or fine motions decreases as the detection range increases, so it’s highly likely the light turns off while people are still in the room. This is commonly known as a false-off. With a longer time delay, the light is remained on so it has enough buffer time for detecting motion again.
A longer time delay is against the purpose of reducing energy waste because the light is kept on to illuminate a vacant room. It often requires rich experience and multiple trials to find the optimal time-out period that can thoroughly balance the user experience and energy-saving.
Time delay is the most frequently altered setting in a motion sensor light switch. Unlike other settings, which are usually utilized identically the same between various users, people would have their own preferences for the time delay setting according to their individual living habits.
The default delayed off-time is usually 5 minutes or 15 minutes, among selectable time delay options from 1min, 5min, 15min, 30min. Some brands like Leviton may provide a shorter time delay, like 30 seconds, to instantly shut off the light once you leave the room.
To program the time delay of a Lutron Maestro sensor switch:
- Press and hold the On/Off button
- Release the button after the lens flashes for the X(th) time
- 1st time: sensitivity test mode(explained later)
- 2nd time: 1 min
- 3rd time: 5 mins
- 4th time: 15 mins
- 5th time: 30 mins
Ambient Light / Daylight Sensing
The ambient light detection, also known as the daylight sensing feature, allows the motion sensor light switch to detect ambient natural light by use of an integrated light sensor. With the daylight sensing mode enabled, the motion sensor switch can only turn on the light if the ambient natural light is low, such as in the evening or at night. If there is enough natural light in the room, then no more artificial light would be needed, so the light will not turn on even when motion is detected.
Generally, several ambient light detection options are available on the market: smart auto-adjustable light level, adjustable light level, or some preset values for users to select from. If you do not need the artificial light to turn on in the daytime, you can set a high ambient light value to prevent the motion sensor light switch from activating the light, such as in the daytime. When you need the light to turn on whenever you enter the room, you can disable the daylight sensing feature.
To program the ambient light of a Lutron Maestro sensor switch:
Press the On/Off button within 5 seconds after users enter the room then the motion sensor will smartly adapt its light sensor value to the user’s preferred light level over time.
Sensitivity / Range
The sensitivity, also known as the range, determines how sensitive, or more precisely, how far the motion sensor can detect motion effectively. With high sensitivity, the motion sensor is able to detect people or motion activities from a longer distance.
But a high sensitivity is not always a good thing, so users should test and adjust the best sensitivity level to suit their specific needs before using the switch. With the sensitivity too low, the motion sensor might not be able to turn on the light as soon as you enter the room. With the sensitivity too high, the motion sensor may frequently catch people walking outside the room and identify that as a motion and turn on the light to illuminate an empty room, which is often known as a false-on.
That’s why some motion sensor switches also provide a test mode to test the sensitivity, such as Lutron Maestro.
The test mode is typically an occupancy mode with a very short time delay(less than 15 seconds), so users can test where the motion sensor can detect to adjust the sensitivity for better coverage. The motion detector lens will flash periodically, indicating that motion has been detected. The motion sensor will automatically exit test mode after 5 minutes or with any button pressed.
To program the sensitivity of a Lutron Maestro sensor switch:
- Press and hold On/Off and auxiliary buttons at the same time
- Release both buttons after the lens flashes for the X(th)time
- 1st time: Motion sensitivity low
- 2nd time: Motion sensitivity high
Reset
Most motion sensor light switches allow users to quickly reset the motion sensor to default settings. If your motion sensor switch does not have a reset function, you can turn off the power to the light switch by flipping off the breaker for several minutes and wait for the motion sensor to reset itself.
To reset all settings of a Lutron Maestro sensor switch:
- Press and hold On/Off and auxiliary buttons simultaneously
- Release both buttons after the lens flashes for the X(th)time
- 1st time: Motion sensitivity low
- 2nd time: Motion sensitivity high
- 3rd time: Return all settings to default
Blinder(Leviton)
The blinders are integral sliding blinders on each side of the lens that may be used to restrict the 180° detection field of view down to 32°, preventing unwanted detection in areas such as hallways. The blinders are not commonly seen but can be seen used in Leviton motion sensor switches.
If you want to achieve a similar purpose of limiting the detection range in other motion sensor switches, you can try to mark the lens with adhesive tapes similar to the blinders and test out the optimal cover range you desire.


Having a picture labeling the buttons would help.